Documentation
AI Assistants
To accelerate your research, JupyterHub ships with built-in, on-premise Generative AI assistants: Jupyter AI, Claude Code, and Posit Assistant.
100% Data Privacy for Scientists: All AI models offered in JupyterHub run on CERIT-SC’s internal, on-premise LLM infrastructure. No code, prompts, or research datasets are ever sent to external providers (like OpenAI or Anthropic).
Jupyter AI (Chat & Cell Magic in JupyterLab)
Best for: Generating plotting code, explaining errors, writing documentation, and quick code snippets.
- Spawn a server using the
DataScience NBimage with theAIbadge. - Look for the Jupyternaut chat icon in the left sidebar to open an interactive chat panel.
Try It Out: Practical Examples
- Sidebar Chat: Click the chat icon, highlight a block of messy analysis code in your notebook, and ask:
“Refactor this pandas code to be faster and add docstrings explaining the statistical transformations.”
- Learn from Local Files: In the chat panel, type
/learnfollowed by a path to your local documentation or.pyscripts so the assistant can answer questions about your specific codebase. - In-Cell
%%aiMagic: You can prompt the LLM directly inside a notebook code cell (refer to the Jupyter AI docs for full syntax):# Load the AI extension in a cell, then generate a publication-ready plot: %load_ext jupyter_ai_magics%%ai Write Python code using seaborn and matplotlib to create a Raincloud plot comparing gene expression levels across 3 treatment groups from a DataFrame `df`. Include ANOVA p-value annotations.
Claude Code (Agentic AI for Complex Workflows)
Best for: Multi-file refactoring, building end-to-end data pipelines, debugging across scripts, and exploring unfamiliar datasets.
Unlike a simple chat window, Claude Code is an agentic assistant that can read your notebooks, inspect data schemas, and navigate your project directory.
- Human-in-the-Loop Safety: Claude Code cannot execute notebook cells or modify critical files without your explicit approval. It will always ask for your permission before making changes.
Launching Claude Code in JupyterLab
- Start a server with the
DataScience NBimage with theAIbadge. - Open your project folder (working inside a dedicated project folder helps the agent understand your file structure).
- Open a terminal or the Claude interface to begin interacting with your codebase. (See the e-INFRA CZ Blog for more visual walkthroughs).


Launching Claude Code in RStudio
- Go to hub.cloud.e-infra.cz. Select the RStudio image with the
AIbadge (version 4.6.1). Configure your required server resources and click Start.
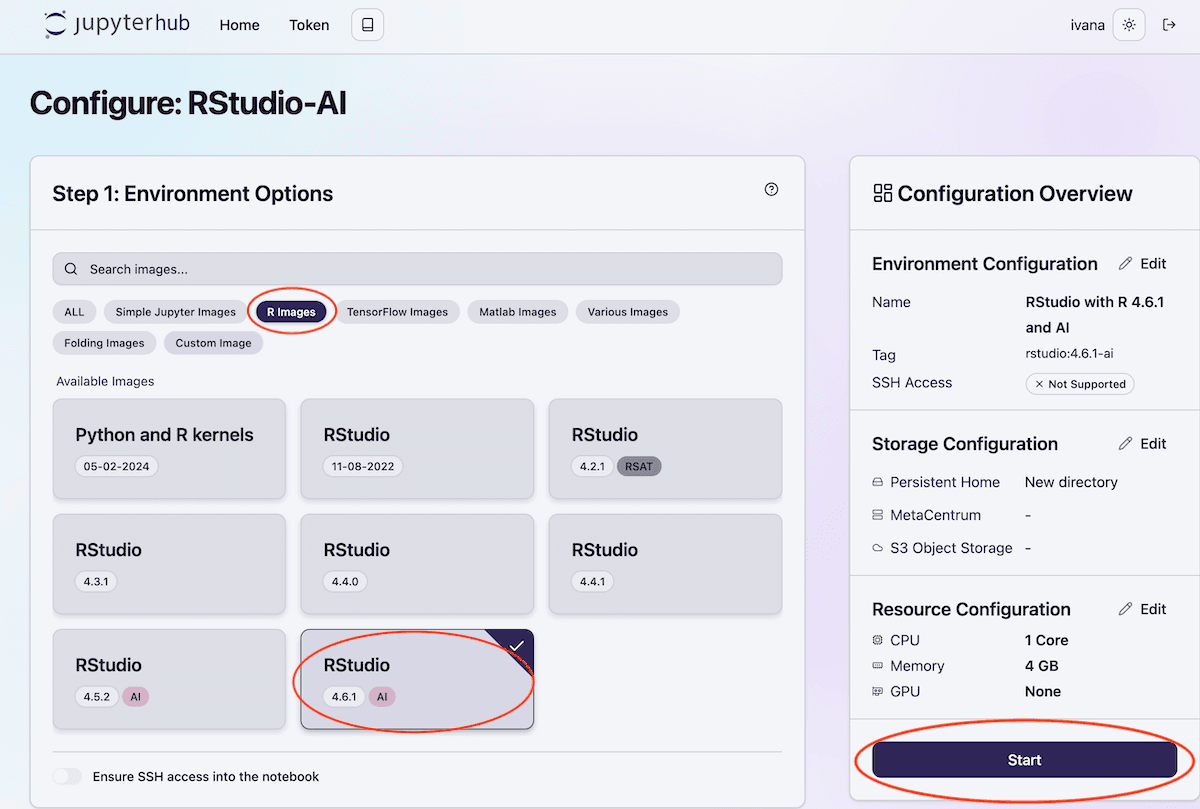
- In RStudio, create a project context: go to File → New Project → New Directory → New Project, name your folder inside your Home directory, and click Create Project.
- Open the Terminal tab inside RStudio, type
claude, and press Enter:claude - Follow the on-screen prompts to approve permissions.


Try It Out: Example Prompts for Claude Code
Once claude is running in your project terminal, try typing natural-language tasks:
- Data Cleaning Pipeline:
“Inspect the CSV files in
./raw_data/. Some have missing timestamps and inconsistent column names. Write a Python scriptclean_data.pyto standardize them and save the output as a Parquet file.” - Debugging & Optimization:
“Read
simulation.py. It runs out of memory whenN > 10000. Identify the memory bottleneck and rewrite it using NumPy vectorization or chunking.” - R Analysis:
“Look at my
analysis.Rscript and the datasetclinical_trial.csv. Add a section that fits a mixed-effects model usinglme4and outputs a summary table.”
Troubleshooting Unresponsive Claude Code: Because the integration relies on browser storage, closing your browser or letting the session time out can cause the assistant to freeze. Fix: Go to the JupyterHub Control Panel, click Stop on your server, and Start it again.
Posit Assistant in RStudio
Best for: Native R coding assistance inside the RStudio IDE.
- Spawn a server with the
RStudioimage with theAIbadge (version 4.6.1). - Once RStudio opens, click Posit Assistant in the top-right corner.
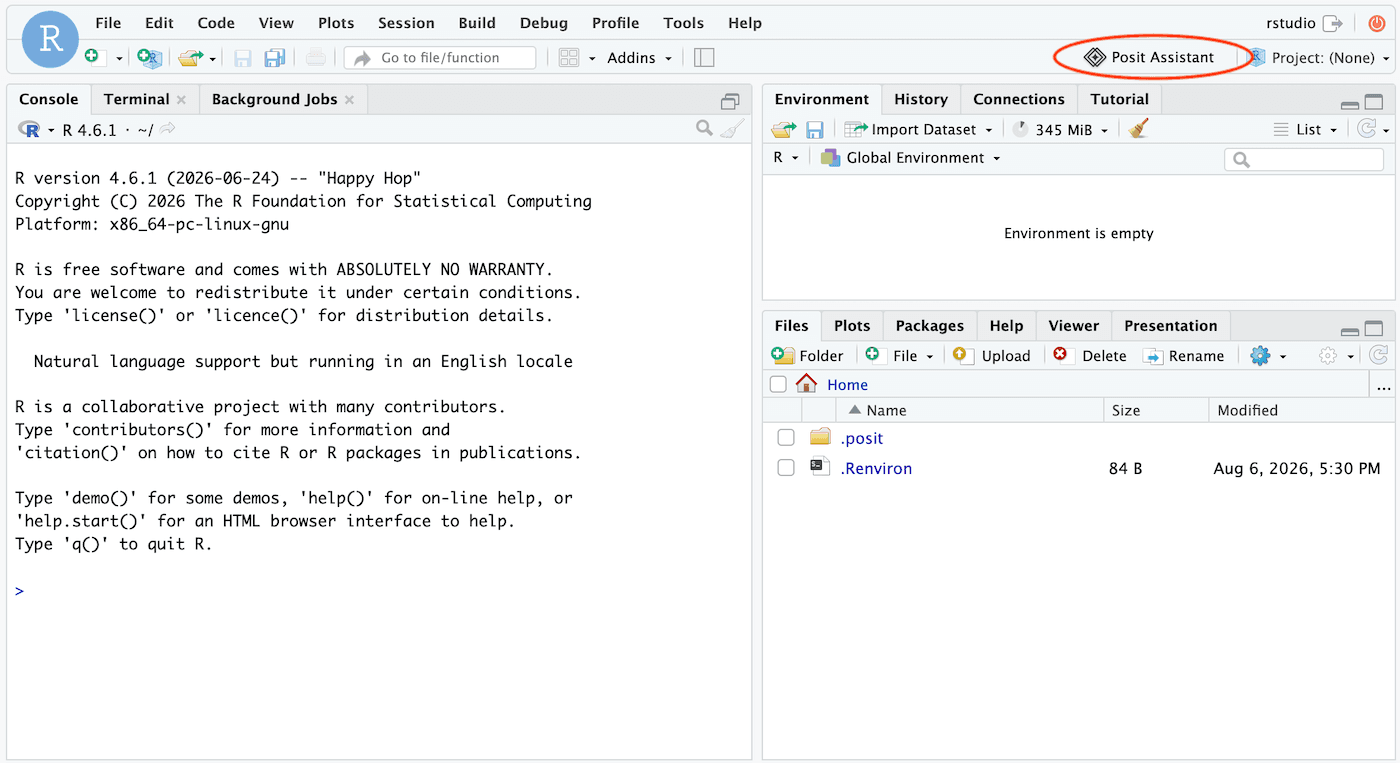
- Click Install Posit Assistant, and when prompted, select Trust Workspace.
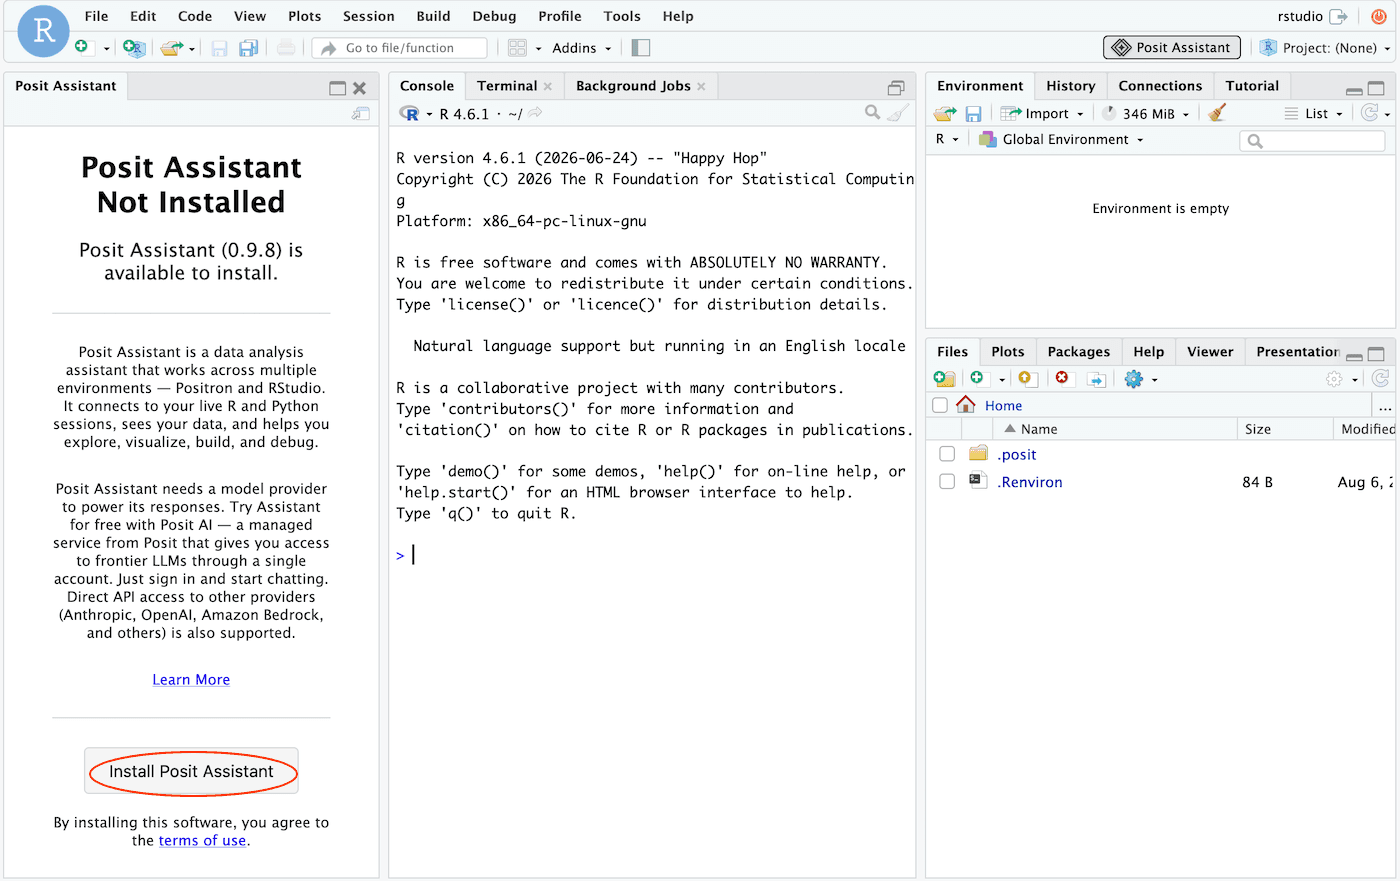
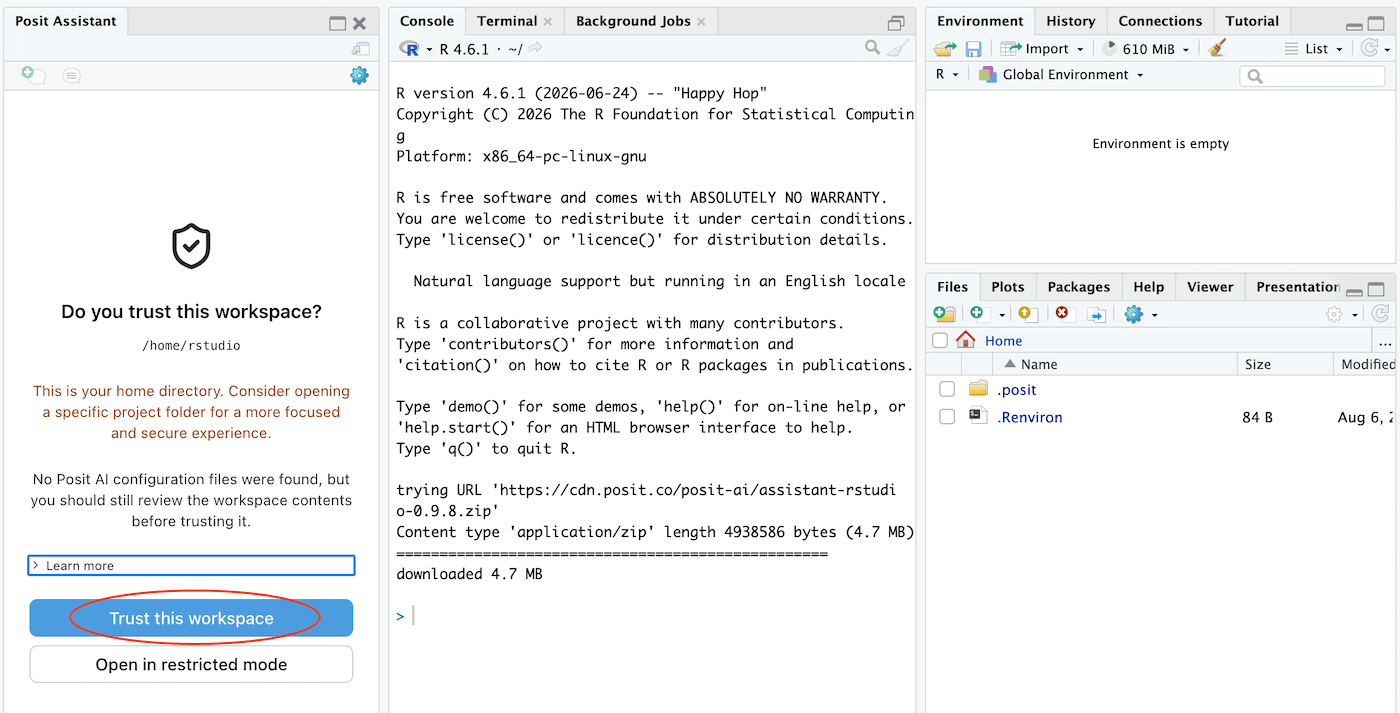
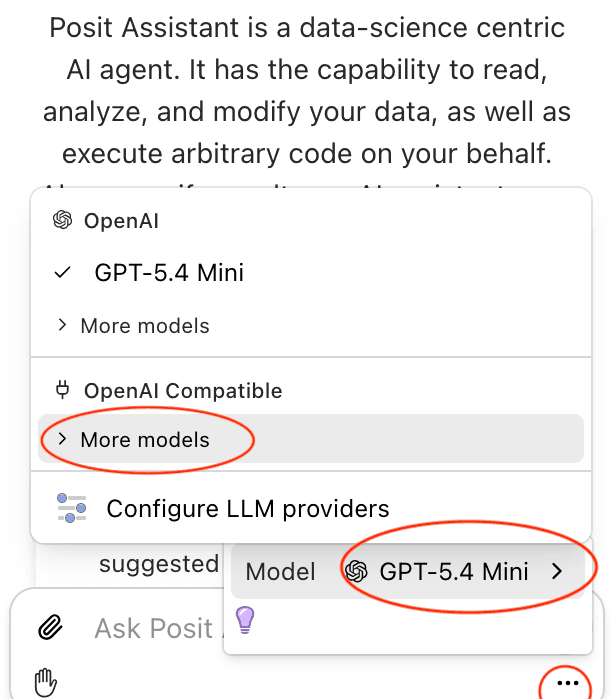
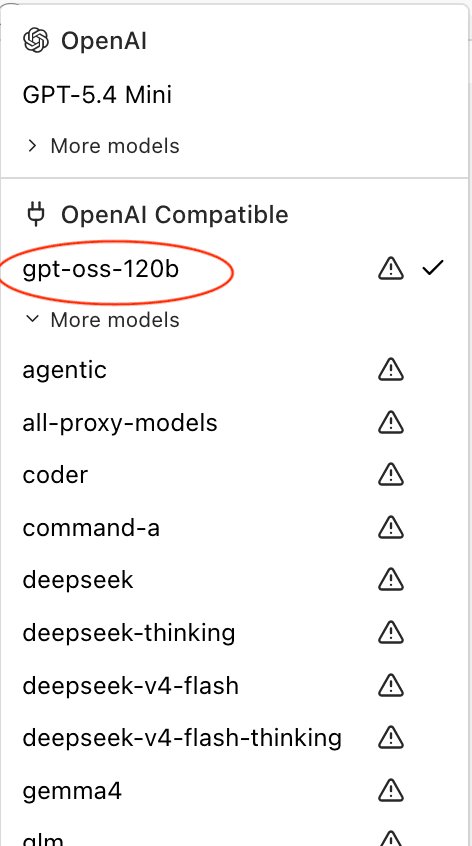
- Select an On-Premise Model:
- Click the
...(three dots) icon in the bottom-left corner of the Assistant panel. - Under the OpenAI Compatible category, select
miniorGPT-OSS-120B(recommended).
- Click the
VS Code with LLM Integration
To use AI assistants inside a browser-based VS Code environment, spawn a server with a VS Code image and follow our dedicated LLM Integration Guide.
Last updated on